How to fix my quicken online sync categorizing my checking accounts as a credit account
Best Answer
-
Thank you for the additional information.
If you don't mind, I'd like to have you create a new (test) file to see if you experience the same issue in a new file as well. In doing so, we will be able to determine whether or not this is caused by an issue within your current data file.
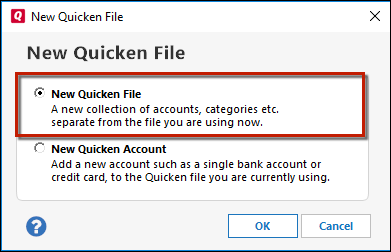
Follow the steps below to create a test file:- Choose File menu > New Quicken File.

- Select New Quicken File.

- Click OK.
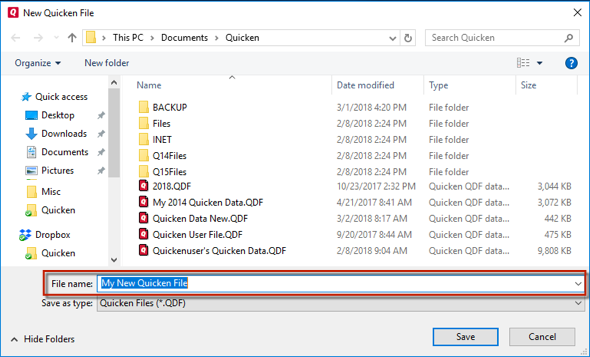
- In the File name field, enter the name of the new file, then click Save. Use a name like "Test File" to easily be able to tell it apart from your main file.
 Don't use any of these characters: * ? < > | " : \ / (asterisk, question mark, left and right-angle bracket, pipe, straight quotation marks, colon, BACKSLASH, FORWARD SLASH). Also, don't add the .qdf extension; Quicken does that for you.
 - Sign in with your Quicken ID (if prompted). If you are prompted to create a Quicken ID, click Sign In under the Create Account prompt.
- Select to not use Mobile (if prompted).
- Click Add Account to try adding the checking account you were unable to add under the correct account type in your original file.
After adding accounts, see if you are experiencing the same problem in this test file. From there, you can then switch back to your original file.
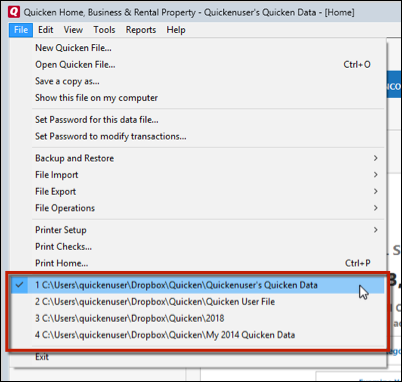
Follow the steps below to switch files:
- Click the File menu.
- Look near the bottom of the options list.
- Select the data file you want to open.

Quicken will list the most recently opened data files, with a checkmark next to the file you are currently viewing.Let us know how it goes!
-Quicken Anja
Make sure to sign up for the email digest to see a round up of your top posts.0 - Choose File menu > New Quicken File.
Answers
-
Hello @omega4e,
Thank you for reaching out to the Community to tell us about your issue, though I apologize that you are experiencing this.
First, could you please provide which version of Quicken you have currently running?- Help > About Quicken
If you haven't already, I suggest that you try adding the account manually (offline) first which will allow you to choose the account type, and then try establishing an online connection with the manual account.
To add a manual account, please review and follow the instruction found in this support article. Then, follow the instructions found in this support article to set it up for transaction downloads (same steps as reactivating a deactivated account).
Please, keep in mind, that if you have the current account set up for transaction downloads, you will need to deactivate the account first before trying the above.
Let us know how it goes!-Quicken Anja
Make sure to sign up for the email digest to see a round up of your top posts.0 -
Thanks for the help!
I am running version R30.10.
I tried to add the account manually and then establish an online connection and I am running into the same problem. Through the manual account I log into the online account and then am asked to select which account I want to and the correct account has the type automatically set to line of credit ( which is incorrect ). When I add it, it creates a new separate credit account - i'm guessing it's doing this because the manual account was set up as a checking account.0 -
Thank you for the additional information.
If you don't mind, I'd like to have you create a new (test) file to see if you experience the same issue in a new file as well. In doing so, we will be able to determine whether or not this is caused by an issue within your current data file.
Follow the steps below to create a test file:- Choose File menu > New Quicken File.

- Select New Quicken File.

- Click OK.
- In the File name field, enter the name of the new file, then click Save. Use a name like "Test File" to easily be able to tell it apart from your main file.
 Don't use any of these characters: * ? < > | " : \ / (asterisk, question mark, left and right-angle bracket, pipe, straight quotation marks, colon, BACKSLASH, FORWARD SLASH). Also, don't add the .qdf extension; Quicken does that for you.
 - Sign in with your Quicken ID (if prompted). If you are prompted to create a Quicken ID, click Sign In under the Create Account prompt.
- Select to not use Mobile (if prompted).
- Click Add Account to try adding the checking account you were unable to add under the correct account type in your original file.
After adding accounts, see if you are experiencing the same problem in this test file. From there, you can then switch back to your original file.
Follow the steps below to switch files:
- Click the File menu.
- Look near the bottom of the options list.
- Select the data file you want to open.

Quicken will list the most recently opened data files, with a checkmark next to the file you are currently viewing.Let us know how it goes!
-Quicken Anja
Make sure to sign up for the email digest to see a round up of your top posts.0 - Choose File menu > New Quicken File.
Categories
- All Categories
- 49 Product Ideas
- 35 Announcements
- 225 Alerts, Online Banking & Known Product Issues
- 18 Product Alerts
- 505 Welcome to the Community!
- 673 Before you Buy
- 1.4K Product Ideas
- 54.9K Quicken Classic for Windows
- 16.6K Quicken Classic for Mac
- 1K Quicken Mobile
- 825 Quicken on the Web
- 120 Quicken LifeHub
