Account Shows Items to be Reconciled Yet There is Nothing to Reconcile

Options
phonedoc1
phonedoc1 Member ✭✭✭

I've been using Quicken since back in the DOS days and never had this issue before so, I guess, in one word - HELP!

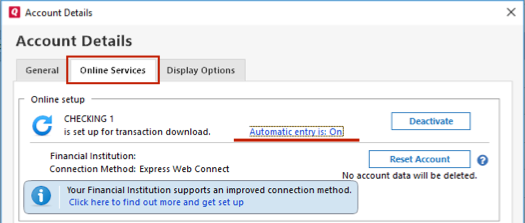
I have a line of credit account with PNC and it is connected via "Web Connect" I have suspected for a while that something was amiss, new transactions would show up but the online balance would not update. As of two months ago, downloading transactions stopped working altogether. No new transactions and no online balance update. However, it now shows I have six unreconciled transactions yet when you go into "Downloaded Transactions" there is nothing there. When you click "Reconcile", it shows you have unaccepted transactions (see attached photo). The red flag is on the left side of the account calling for attention and when you click it, it says "You have 6 transactions to review". The problem was worse, showing 42 unaccepted transactions but a file validation fixed all but the remaining 6. Another file validation showed everything squeaky clean. I had hoped a deactivate/reactivate of online services would correct the issue but it won't let me deactivate the account, saying "Quicken can not edit PNC Line of Credit because there are downloaded transactions that must be accepted - - - - - - -". Finally, "Reset Account" is grayed out, so no joy there. Anyone else ever see this problem and does anyone have a fix? Thanks in advance, I appreciate your collective brain power!

Best Answers

  • Quicken Kristina
    Quicken Kristina Moderator mod
    Answer ✓
    Options

    Hello @phonedoc1,

    To troubleshoot this issue, let's try following the steps from this article on when Quicken says there are transactions to accept, but you don't see any:

    First, since I see you have it off, turn automatic entry on

    1. Press Ctrl+A on the keyboard to bring up the Account List, then click the Edit button next to the affected account in the list.  
    2. In the Account Details window, click on the Online Services tab then click Automatic entry is
    1. Select Yes on the next dialog box and click OK. Automatic entry should show as "On" now.
    2. Click OK to close the Account Details window, then click Done on the Account List.
    3. Close Quicken, wait a few seconds, then re-open it. The transactions should appear upon re-opening Quicken.

    Note: If you have multiple accounts affected by this issue, you can make the change outlined above to all the accounts at once by going to Edit > Preferences, then going to Downloaded transactions and unchecking the box next to Automatically add to banking registers.

    Then, check the account register and Online Center

    Quicken will show you downloaded transactions in multiple locations. The following information shows you how to check for downloaded transactions in the account register and Online Center.

    1. Open the account register and select Downloaded Transactions at the bottom of the register.
      • If there are transactions listed, accept them to the register.
      • If there are not any transactions listed, proceed with the next step.
    2. Choose the Tools menu > Online Center.
    3. Select the appropriate financial institution and account.
    4. Select Transactions.
      • If transactions are listed, click Compare to Register and accept the transactions. Note: Compare to Register will display online payments on the initial screen. After accepting your online payments, click ContinueNext or Done to see the rest of your downloaded transactions.
      • If no transactions are listed or Compare to Register does not allow you to accept the transactions, proceed to the next section.

    Lastly, correct data issues

    If the Quicken data file is damaged, you might receive prompts about downloaded transactions when you don't have any downloaded transactions. 

    If you know when this issue began, the best solution is to restore a backup created before this issue began.

    If you do not have a backup to restore, Quicken has a built-in utility, Validate, that will correct many data issues. Please note this does not correct all issues and these steps should be taken if the other steps outlined did not resolve the problem.

    1. Choose the File menu > Copy or Backup File.
    2. Select Create a copy or template, then click Next
    3. Accept all defaults and click Save Copy.
    4. Open the New Copy when prompted.
    5. Choose the File > Validate and Repair File.
    6. Select the new copy created in step 3 and click OK.

    Note: Depending on the size of your data file, you may need to wait a while for the validation process to finish. Do not use the Task Manager to close Quicken. Quicken displays an error message if it cannot validate the file. If Quicken is able to validate the file and any errors are found, Quicken displays a message, "Data losses were found in your file." You can view the log file for more information.

    When the validation process is complete, you will need to Reactivate your accounts for transaction download in the new file copy.

    1. Go to Tools > Add Account.
    2. Select the bank for the deactivated account(s). If prompted, select the connection method.
    3. Enter your credentials and click Connect.
    4. When the list of located accounts appears, choose LINK next to each account you want to reactivate.
    5. Click Next then Done on the last prompt.
    6. After all of your accounts have been Reactivated, complete the Check the account register... section steps above again.

    Please let me know how it goes!

    Quicken Kristina

    Make sure to sign up for the email digest to see a round up of your top posts.

  • phonedoc1
    phonedoc1 Member ✭✭✭
    Answer ✓
    Options

    Kristina -

    I followed the steps you outlined. The first step "Edit Account Details/Online Services" did not have the "Automatic Entry is (On/Off)" as you indicated in the example. I then went to Edit/Preferences/Downloaded Transactions. As soon as I clicked "Automatically add to banking registers" a box popped up. It asked if I wanted to convert a transaction into a transfer. I clicked yes. The box closed and the red flag on the account in question went away. All appears normal. Hooray! Thank you very much for your assistance.😊

Answers

  • Quicken Kristina
    Quicken Kristina Moderator mod
    Answer ✓
    Options

    Hello @phonedoc1,

    To troubleshoot this issue, let's try following the steps from this article on when Quicken says there are transactions to accept, but you don't see any:

    First, since I see you have it off, turn automatic entry on

    1. Press Ctrl+A on the keyboard to bring up the Account List, then click the Edit button next to the affected account in the list.  
    2. In the Account Details window, click on the Online Services tab then click Automatic entry is
    1. Select Yes on the next dialog box and click OK. Automatic entry should show as "On" now.
    2. Click OK to close the Account Details window, then click Done on the Account List.
    3. Close Quicken, wait a few seconds, then re-open it. The transactions should appear upon re-opening Quicken.

    Note: If you have multiple accounts affected by this issue, you can make the change outlined above to all the accounts at once by going to Edit > Preferences, then going to Downloaded transactions and unchecking the box next to Automatically add to banking registers.

    Then, check the account register and Online Center

    Quicken will show you downloaded transactions in multiple locations. The following information shows you how to check for downloaded transactions in the account register and Online Center.

    1. Open the account register and select Downloaded Transactions at the bottom of the register.
      • If there are transactions listed, accept them to the register.
      • If there are not any transactions listed, proceed with the next step.
    2. Choose the Tools menu > Online Center.
    3. Select the appropriate financial institution and account.
    4. Select Transactions.
      • If transactions are listed, click Compare to Register and accept the transactions. Note: Compare to Register will display online payments on the initial screen. After accepting your online payments, click ContinueNext or Done to see the rest of your downloaded transactions.
      • If no transactions are listed or Compare to Register does not allow you to accept the transactions, proceed to the next section.

    Lastly, correct data issues

    If the Quicken data file is damaged, you might receive prompts about downloaded transactions when you don't have any downloaded transactions. 

    If you know when this issue began, the best solution is to restore a backup created before this issue began.

    If you do not have a backup to restore, Quicken has a built-in utility, Validate, that will correct many data issues. Please note this does not correct all issues and these steps should be taken if the other steps outlined did not resolve the problem.

    1. Choose the File menu > Copy or Backup File.
    2. Select Create a copy or template, then click Next
    3. Accept all defaults and click Save Copy.
    4. Open the New Copy when prompted.
    5. Choose the File > Validate and Repair File.
    6. Select the new copy created in step 3 and click OK.

    Note: Depending on the size of your data file, you may need to wait a while for the validation process to finish. Do not use the Task Manager to close Quicken. Quicken displays an error message if it cannot validate the file. If Quicken is able to validate the file and any errors are found, Quicken displays a message, "Data losses were found in your file." You can view the log file for more information.

    When the validation process is complete, you will need to Reactivate your accounts for transaction download in the new file copy.

    1. Go to Tools > Add Account.
    2. Select the bank for the deactivated account(s). If prompted, select the connection method.
    3. Enter your credentials and click Connect.
    4. When the list of located accounts appears, choose LINK next to each account you want to reactivate.
    5. Click Next then Done on the last prompt.
    6. After all of your accounts have been Reactivated, complete the Check the account register... section steps above again.

    Please let me know how it goes!

    Quicken Kristina

    Make sure to sign up for the email digest to see a round up of your top posts.

  • phonedoc1
    phonedoc1 Member ✭✭✭
    Answer ✓
    Options

    Kristina -

    I followed the steps you outlined. The first step "Edit Account Details/Online Services" did not have the "Automatic Entry is (On/Off)" as you indicated in the example. I then went to Edit/Preferences/Downloaded Transactions. As soon as I clicked "Automatically add to banking registers" a box popped up. It asked if I wanted to convert a transaction into a transfer. I clicked yes. The box closed and the red flag on the account in question went away. All appears normal. Hooray! Thank you very much for your assistance.😊

  • Quicken Kristina
    Quicken Kristina Moderator mod
    Options

    Thank you for the follow up,

    I'm glad to hear the issue is resolved.

    If you need further assistance, please feel free to reach out!

    Quicken Kristina

    Make sure to sign up for the email digest to see a round up of your top posts.

This discussion has been closed.