This discussion was created from comments split from:
Fidelity money market automatic redemptions
.
@BillBarns @Quick92 @Quicken Kristina
I too have seen the "red flag with no transactions" bug for years, with no resolution other than to quit and restart Quicken. I finally reported it as a bug a month or so ago. Not to drift off topic of this thread, but this is just one of less critical but very annoying bugs in Quicken that never get fixed. (Data entry in split transactions and the utility and performance of Find/Replace also come readily to mind.) I wish they'd spend multiple release cycles focusing on bugs and usability / performance issues rather than new features — the tool desperately needs it.
Hello @bdantes,
Thank you for letting us know this has been a recurring issue for you. I moved your post to a new discussion so that I could respond without pulling the other discussion off topic.
The "red flag with no transactions" issue is a known issue, and we do have a Community Alert for it:
If you haven't already done so, I recommend following the troubleshooting from our article on when Quicken says there are transactions to accept but you don't see any:
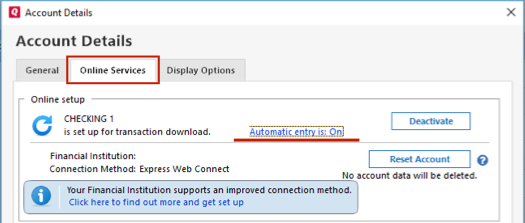
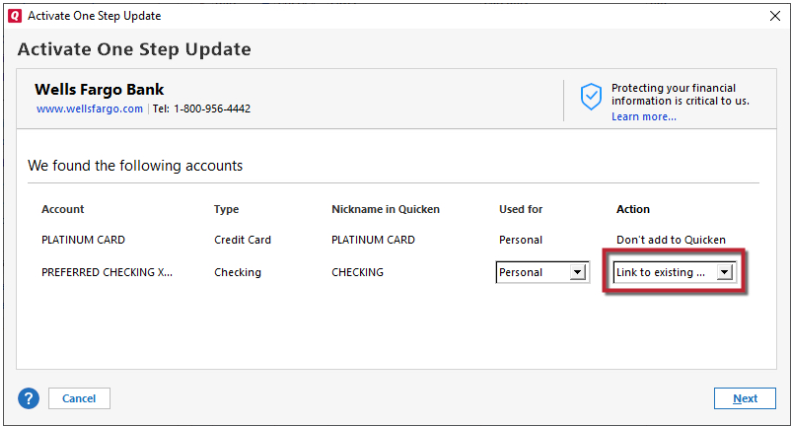
1. Press Ctrl+A on the keyboard to bring up the Account List, then click the Edit button next to the affected account in the list.
2. In the Account Details window, click on the Online Services tab then click Automatic entry is.
3. Select No on the next dialog box and click OK. Automatic entry should show as "Off" now. If it's already off, select Yes and click OK to turn it on.
4. Click OK to close the Account Details window, then click Done on the Account List.
5. Close Quicken, wait a few seconds, then re-open it. The transactions should appear upon re-opening Quicken.
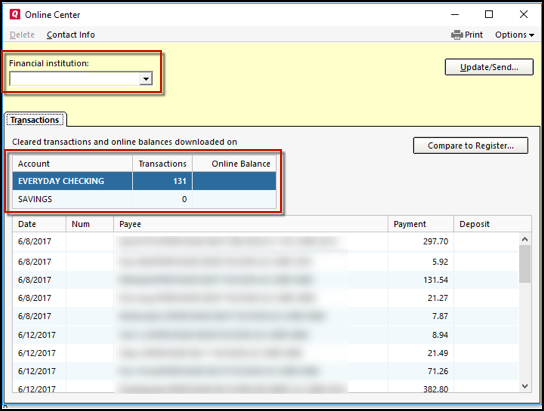
Quicken will show you downloaded transactions in multiple locations. The following information shows you how to check for downloaded transactions in the account register and Online Center.
4. Select Transactions.
If the Quicken data file is damaged, you might receive prompts about downloaded transactions when you don't have any downloaded transactions.
If you know when this issue began, the best solution is to restore a backup created before this issue began.
If you do not have a backup to restore, Quicken has a built-in utility, Validate, that will correct many data issues. Please note this does not correct all issues and these steps should be taken if the other steps outlined did not resolve the problem.
Note: Depending on the size of your data file, you may need to wait a while for the validation process to finish. Do not use the Task Manager to close Quicken. Quicken displays an error message if it cannot validate the file. If Quicken is able to validate the file and any errors are found, Quicken displays a message, "Data losses were found in your file." You can view the log file for more information.
When the validation process is complete, you will need to Reactivate your accounts for transaction download in the new file copy.
Please let me know how it goes!
@Quicken Kristina
Restarting Quicken alone has always made the missing transactions appear in my case. Also, I have validated (and super validated) my data file many times. No issues.
If there is some workaround until this bug is found to get the transactions to show up other than restarting Quicken, that would be good to know. Restarting Quicken is tedious, including having to reenter passwords for the data file itself and the Password Vault.
Thank you for your reply @bdantes,
My apologies for the delayed response. For some reason, I didn't receive a notification that you'd replied.
We do have a Community Alert that you can bookmark in order to receive notification of any updates, when available, and to know when the issue is resolved:
In the meantime, I recommend that you contact Quicken Support about this issue, since there is specific information they need to gather to escalate the issue as needed. The Quicken Support phone number can be found through this link here. Phone support is available from 5:00 am PT to 5:00 pm PT, Monday through Friday.
Thank you!
This problem is happening to me fairly often now, and it's very frustrating. I did "Report a Problem" through the software, but honestly all of my direct interactions with phone support have not been good. I really don't want to waste my time there — especially when you pointed out above that it's been a known issue for well over a YEAR! Pretty terrible that has seen no update since then.
Thank you for your reply,
You mentioned that you have validated many times. Did you create a copy of the file and validate the copy? Creating a copy of the file can resolve some issues, since it forces Quicken to rebuild the database. For instructions, see the Lastly, correct data issues section of the article linked below, or review the last section of my initial post.
If creating a copy doesn't correct the issue either, then please provide the following information:
Resetting all of the account connections is really agonizing. Also, this process has the same bug as Super Validate (which I've reported a couple of times): it asks to set a new password on the data file, but that password fails to open the file — forcing the Forgot Password process and then Setting the Password again.
The copy did find a PDF attachment that it couldn't copy: "Quicken encountered an error copying a transaction attachment dated <Date> in account '<Account>'. Continue copying attachments?" (to which I said yes) — an error that didn't show up in Validate or Super Validate on the original file. And it left the same dandling / corrupted attachment link in the new file — an attempt to view did nothing, and an attempt to export it crashed Quicken. And an attempt to delete it from the original or copied file does nothing. :-( This account is NOT one of the ones with downloaded transactions.
This flagged downloaded transactions with no actual transactions to show error has been happening repeatedly for as long as I can remember (and I've been using Quicken for literally decades) — but it does seem to have picked up in frequency to several times a month or more. It happens across all types of accounts. I download to all my accounts at least daily.
If your engineers have known of this issue this long, have they ever discovered a consistent reproducer? My presumption is no.
@Quicken Kristina Worse than agonizing. After reactivating Fidelity accounts in the new data file, I get CC-601 errors saying there are "We cannot find an account with non-zero balance or with any transaction in the last 12 months. Please check on your Fl website and try again."
Really is frustrating dealing with bug after bug in this software. This stuff should "just work."
Thank you for your replies,
The CC-601 error with Fidelity is a known issue. To receive notification of updates and to know when the issue is resolved, please bookmark this Community Alert:
To clarify, it sounds like there were other problems, but was the issue with the red flags resolved in the copied file?
The CC-601 errors don’t occur in the original data file. This only happens with the Fidelity accounts for me — everything else when connected in the new file has no issues. Why is only my new file experiencing CC-601 errors with Fidelity?
Regarding the red flags, that issue always goes away after a restart of the app. I won’t know until I’ve seen transactions come down a bunch of times over a month without the issue before I would believe it might be fixed. It’s sporadic. FWIW, I do not believe it’s related to anything corrupted in my data file — I was just trying to do as you asked. I strongly believe this is a software bug, particularly given that it happens to others. Again, have your engineers managed to reproduce this? That’s 99% of the effort to fix most bugs.
Another side note — the fact that data corruption can occur in the first place is sort of amateurish, honestly. Why isn’t Quicken using a bonafide database with ACID to prevent that sort of thing? Having a bunch of hidden features for validating and repairing data does not speak well for the stability of the software. :-( I wish I didn’t have decades of legacy data in Quicken — I would’ve left years ago over all these terrible bugs otherwise.
And as long as I’m whining, I find it absurd that Quicken for Mac is STILL not at feature parity with Quicken for Windows, and that migration of data loses information, like attachments. I should be able to use the exact same data file with either product with the exact same functionality. Or at the barest minimum, a truly robust migration tool should exist that loses no data. I’ve had to run a Windows VM for years on my Mac just for Quicken.
Thank you for the follow-up,
CC-601 errors arise in the new file when connecting Fidelity accounts. If these accounts are already linked in your main file, you should only see the issue if you reset or reconnect them.
Again, have your engineers managed to reproduce this?
As far as I know, our teams haven't been able to reproduce the issue. Based on your description, is the problem in your file intermittent?
I strongly believe this is a software bug, particularly given that it happens to others.
To test for a software bug, start by backing up your Quicken file. Next, install a patch that predates the issue's onset. Use the article below to download and apply the appropriate earlier patch: https://www.quicken.com/support/reinstalling-and-patching-your-quicken-subscription-version-after-your-membership-has/#section-windows-3
I guess I haven’t been clear. Yes, the red flag issue is intermittent, sporadic, and unpredictable across many accounts. If it happened every time, I would’ve been able to troubleshoot it with phone support for a fix ages ago. As for rolling back to a previous patch, this problem has been going on for YEARS (and I have used “Report a Problem” multiple times going back years too). And rolling back to a prior patch is a huge risk of (re)introducing more bugs and instability. I don’t think that’s a viable suggestion.
It would even mitigate if there were any workaround other than the severe one of restarting the app. Your engineers should be focused on finding a reproducer — and barring that, introduce extra debug logging around transaction downloads for users to report when the error occurs.
To the CC-601 Fidelity errors I’m now experiencing in the new file only, I did not reset any connections — I simply added them per the instructions. I was beginning to think I needed to deactivate the prior connections in the original file first, but no reconnected accounts besides Fidelity have this CC-601 issue.
So now I’m faced with continuing with my old file or figuring out how to stop these CC-601 Fidelity errors.
(And by the way, I ran into a couple of other bugs when trying to copy and validate the new file, but I won’t go into those here. I’m just getting really exhausted spending hours trying to get the software to do its job without bugs!)
Since there are other issues in the copied file, I suggest returning to your main file. In the main file, please try following these steps (Warning: Following these steps with your Fidelity accounts may trigger the known issue with CC-601 errors):
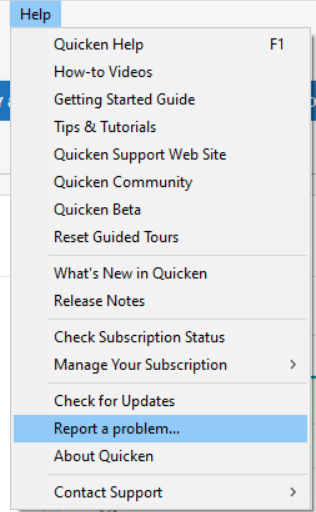
If you're willing to help with the investigation of this issue, please navigate to Help>Report a Problem and send a problem report with log files and a sanitized data file attached. If you have a copy of one of the logs from when you validated the file, attaching that would also be helpful. Note: Problem reports allow a maximum of 10 attachments. If you need to send more than 10, you can unselect any file with OLD in the filename, or you can send a 2nd problem report with the additional attachments.
I hope this helps!
At this point, I have both my old (with the two Fidelity connections, which never had the CC-601 errors) and the new (with the new connections that had the CC-601 errors but as of today now don't) files working with everything again. Both files show up completely clean under Super Validation (and I was able to fix the transaction with the corrupted attachment only by completely deleting it and reentering it from scratch — trying to delete the attachment from the existing transaction just did nothing — and btw that transaction went over with them same broken attachment into the new copy, despite a warning saying that the attachment couldn't be copied).
I will wait to see when the Red Flag with no transactions shows again in either file — and try to send log files. I will never be comfortable sending a sanitized data file though, sorry. It's why I use the desktop product only.
Please let me know if the red flag issue happens again.
The problem has just recurred. I resent logs, etc., through "Report a Problem."
Closing and restarting Quicken, as always, makes the transactions show up. There are no validation errors in the file.
@bdantes,
Thank you for following up on this.
We do have a Support Article that covers this issue. It may be worth checking that out and going through the steps.
Here are the first steps:
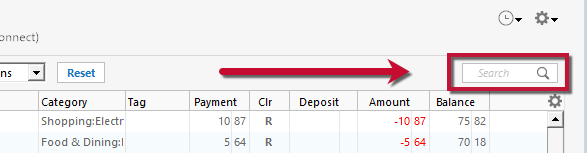
Ensure the Search bar above the register is cleared. Text in the Search bar will adjust the register to only show transactions that match that text.
3. Select No on the next dialog box and click OK. Automatic entry should show as "Off" now.
Note: If you have multiple accounts affected by this issue, you can make the change outlined above to all the accounts at once by going to Edit > Preferences, then going to Downloaded transactions and unchecking the box next to Automatically add to banking registers.
Please review the article for the remaining steps. If these steps don't resolve the issue, you can contact Quicken Support directly. Do keep in mind that we do have an Open Alert as well.
Hope this helps!
@Quicken Alyssa
I have been through those steps multiple times — please review this entire thread. @Quicken Kristina has already suggested what you just did. I do not have automatic entry on for any of my accounts. This problem is sporadic, happens randomly in different accounts, and has been occurring for years. And that "Open Alert" to which you refer has also not been updated in over a year.
As I have previously noted, my experience with direct phone support has always resulted in a huge waste of time. Thus, I have done as @Quicken Kristina last suggested, I sent the log files under "Report a Problem" as soon as it happened again. I'm hoping one of you can alert your engineers to the additional data point.
[Removed-Speculation]
I apologize that you have been experiencing this issue for so long.
I did not see that Kristina had previously mentioned the steps I provided. Thank you for pointing that out.
The alert linked above has not been updated because no updates have been provided on the issue. I can assure you that our team is actively working toward a resolution. We do not have an ETA as to when it will be fully resolved.
We apologize for the inconvenience and appreciate your patience as we work through this issue.
Thanks again.
[Removed - Violation of Community Guidelines]