Creating CSV file for importing credit card transactions - what do you put for Account?
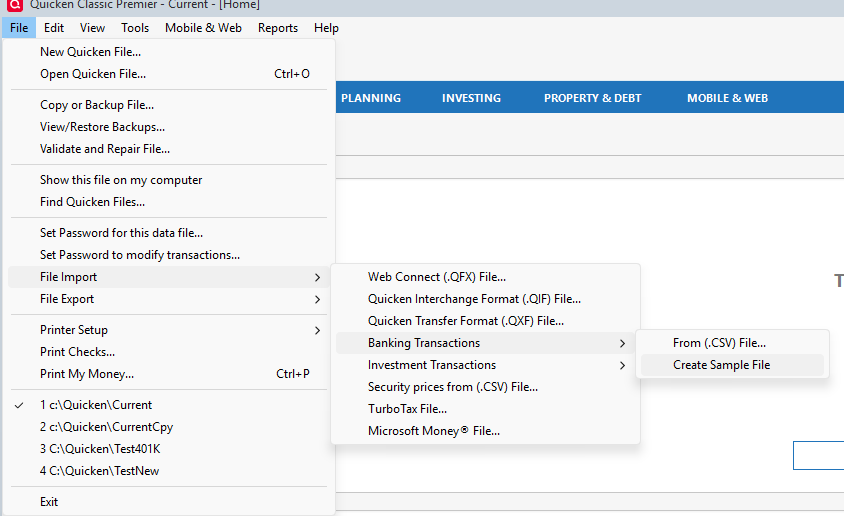
Hello, I am pretty new to Quicken, and this is my first post! I have Quicken for Windows 11, R62.29. I'm attempting to create my own CSV file to import the transactions of this new credit card I signed up for, as I found out recently Quicken cannot connect to the account online (I tried to search for the card in the online connection option, but it was not there), and there is no Excel file provided by the credit card provider, only PDF statements, for the transactions. Quicken provides instructions on what columns of data to have in what order for the CSV file for importing transactions. One of these is "Account" which must have data in that column, according to the instructions. However, I'm not sure what to put there. Is this the name of the account for the credit card I have in Quicken, like "XYZ Visa"? I don't know how else Quicken will know this is a transaction for this particular credit card account. Thanks in advance for the help!
Best Answers
-
Yes, the Account field should be the name of the account in Quicken that you want the transactions to be imported into. Note that when doing the import you can select Create Sample to have Quicken create a sample so that you can see what all is expected.
EDIT: The reason for the account name field is because you can import into multiple accounts from the same CSV file, and also because there isn't any "browsing" to pick the "import account".
Signature:
This is my website (ImportQIF is free to use):1 -
In case it is not clear, you must create an offline credit card account in Quicken to hold the transactions you will be downloading. Go to Tools > Add account > Offline account and follow the directions from there.
The name of that account is what you put in the Account column of the CSV file.
QWin Premier subscription2
Answers
-
Yes, the Account field should be the name of the account in Quicken that you want the transactions to be imported into. Note that when doing the import you can select Create Sample to have Quicken create a sample so that you can see what all is expected.
EDIT: The reason for the account name field is because you can import into multiple accounts from the same CSV file, and also because there isn't any "browsing" to pick the "import account".
Signature:
This is my website (ImportQIF is free to use):1 -
In case it is not clear, you must create an offline credit card account in Quicken to hold the transactions you will be downloading. Go to Tools > Add account > Offline account and follow the directions from there.
The name of that account is what you put in the Account column of the CSV file.
QWin Premier subscription2 -
Thank you both, Chris and Jim. Your collective advice and info was very helpful. I did manage to import using a CSV file, though not without hiccups, because after trying to import, Quicken said that the named account I had in my CSV file didn't exist, when clearly I had added it to Quicken (it was listed in the list of accounts on the left-hand side, and I had copied and pasted the name directly from the account info window into the CSV file). I think the issue was with the name I had given to the account, which started with numbers (based on the card brand name). I ended up renaming the account to something more basic and updating the CSV file accordingly, and after doing so, the import worked.
Special thanks to Chris for the screenshot and the "Create sample file" option, as I didn't realize they created a sample CSV file. I ended up using that. I hope Quicken will update their instructions on importing transactions to include that detail, not to mention what to put down for "Account." 😁
1
Categories
- All Categories
- 58 Product Ideas
- 34 Announcements
- 238 Alerts, Online Banking & Known Product Issues
- 19 Product Alerts
- 511 Welcome to the Community!
- 678 Before you Buy
- 1.4K Product Ideas
- 55.2K Quicken Classic for Windows
- 16.7K Quicken Classic for Mac
- 1K Quicken Mobile
- 828 Quicken on the Web
- 123 Quicken LifeHub


