How do you change the account action from "do not add to quicken" to "add to quicken?"
Hello @wabuckeye,
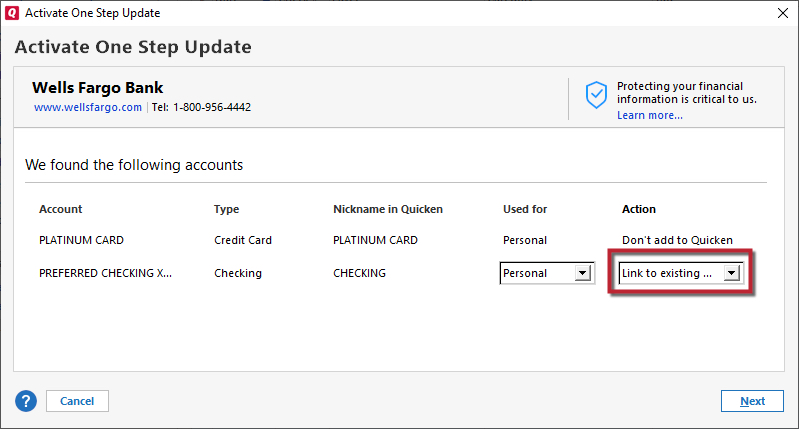
Thank you for reaching out to the Community and telling us about this issue. I'm sorry to hear you're running into this problem. When you are seeing "Do not add to quicken", that means Quicken thinks the account is already connected. As you can see in the sample image below, to the left of "Don't add to Quicken", it should show you a Nickname in Quicken. That is what it thinks the account is currently connected to.
If it is seeing an incorrect nickname, you would need to backup your Quicken file, then deactivate that account. Once you have the nickname Quicken thought it was connected to deactivated, you should be able to go to Tools>Add Account and follow the prompts to get your account connected to the correct nickname in Quicken. When you are back at that Add/Link screen, make sure it shows "Link to existing" for the action and verify that it sees the correct Nickname in Quicken.
Thank you.
Thank you for your reply,
When you are referring to getting a notice the account is already hooked up to Quicken, do you mean you are seeing this on the add/link screen (sample image is in my earlier post)? If so, then the nickname it is telling you would be where Quicken thinks the account is connected to.
If this isn't what you are seeing, would you be willing to post a screenshot of the message (with any personal information obscured or blurred)? If needed, please refer to this Community FAQ for instructions on how to attach a screenshot. Alternatively, you can also drag and drop screenshots to your response if you are not given the option to add attachments.
Thank you for your reply and the screenshot,
When I take a look at the screenshot you included, it shows that Quicken thinks your Chase account is connected to an account nicknamed Doug's IRA.
To correct this, first backup your Quicken file by going to File>Copy or Backup File. Make sure Create a complete backup is selected, then click Next. Verify that it is saving where you want it saved. If you want date and/or time added, make sure those boxes are checked.
Once the backup is complete, you will need to deactivate the account named Doug's IRA in your Quicken. To do that, go to Tools>Account List. Find Doug's IRA in your account list and click the Edit button next to that account name. Then, click on the Online Services tab. You should see a button that says Deactivate. Click that button.
If confirmation boxes pop up, read the messages and hit the appropriate responses.
Once the account is deactivated, you should be able go to Tools>Add Account, search for the financial institution, and follow the prompts to reconnect. Make sure you are paying attention on the Add/Link screen in Quicken. If the AI guesses wrong and you don't catch it, the account will get linked to the wrong nickname again or get added as new.
Make sure the action says Link to existing and the nickname in Quicken is correct. If it is displaying incorrect information, you can click on the dropdown, select Link to existing, and then select the correct nickname.