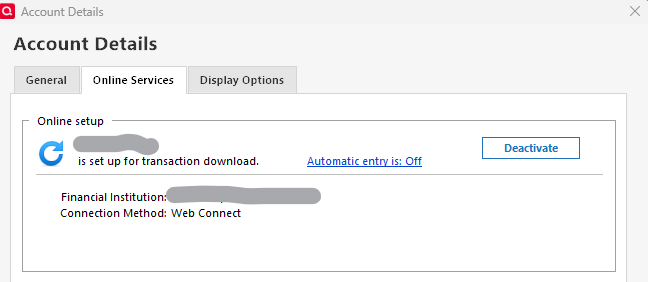
Deactivate button does not appear in Online Services tab

I have Windows 11, Quicken Classic Deluxe (online subscription) & am trying to set up Express Web Connect+ for BofA account (because they stopped supporting Web Connect). When I navigate to Online Services tab, it says the BofA account is "set up for transaction download" which I need to deactivate. I've been searching all the info on this process & it always says to click on Deactivate button - but there is no Deactivate button. What happened to the Deactivate button?
Comments
-
Hello @BRGrits,
Thank you for sharing your experience!
I can see why this would be confusing, definitely strange that you are not seeing the deactivate button. I have some follow-up questions for you.
- How long has the deactivate button been missing?
- Are you seeing a Set Up Now button there instead?
- Is this happening with only one account, or is more than one account affected?
- Where is your data file located?
- You can see this by going to File. The first file listed near the bottom of the menu is the file you are currently in. The file path will be shown there, and that is what we are looking for.
- Is your file being synced/backed up by any third-party services like OneDrive, Dropbox, or Google Drive?
Additionally, screenshots of what you are seeing may be helpful. If needed, please refer to this Community FAQ for instructions on how to attach a screenshot. Alternatively, you can also drag and drop screenshots to your response if you are not given the option to add attachments.
One thing you can try is validating your file. To do this:
- Save a backup.
- Go to File.
- Select Validate and Repair file…
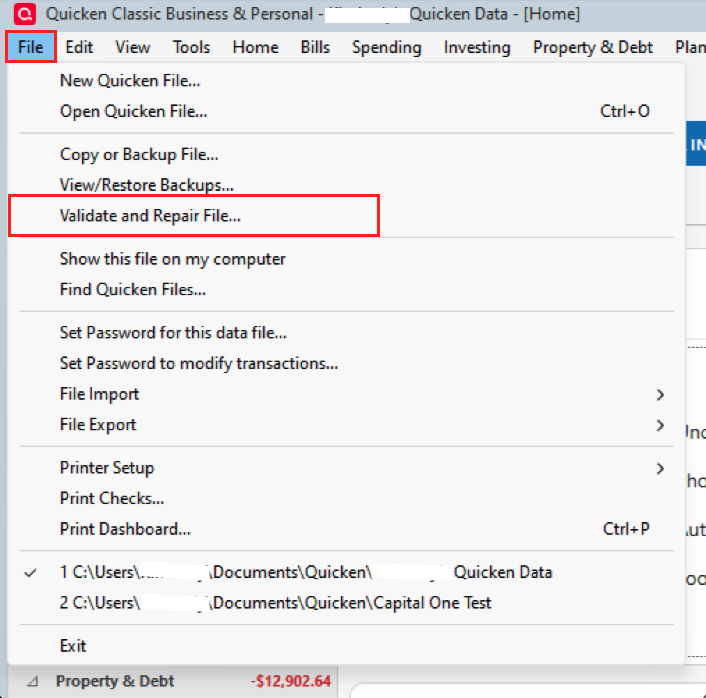
- Check the first box for Validate file.
- Click Ok.
Once the validation has completed, it will produce a report of anything it has found/corrected. After this, check to see if the button has returned, and let me know if anything has changed.
Thank you.
Quicken Alyssa
Make sure to sign up for the email digest to see a round up of your top posts.
0 -
I have this same issue and validated the file with no errors —- still no deactivate button. please help.
0 -
An account that was used to receive transactions from a QFX file download (aka Webconnect in Q for Windows) is not really connected, i.e., activated for transaction download. Therefore, there's no Deactivate button.
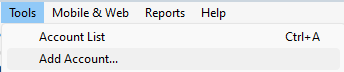
Unless I'm mistaken, you should be able to activate your BofA account(s) for downloading with One Step Update by doing a Tools / Add Account process and selecting the new BofA financial institution name from the list:
Bank of America- Quicken. [recently renamed]
If that fails and doesn't show you the desired account as available to connect, you may have to go into Edit Account Details, General tab and blank out the Financial Institution name field, then retry Add Account.0 -
An account that was used to receive transactions from a QFX file download (aka Webconnect in Q for Windows) is not really connected, i.e., activated for transaction download. Therefore, there's no Deactivate button.
@UKR , Interesting. my Web Connect account shows the Deactivate button.
- Q Win Deluxe user since 2010, US Subscription
- I don't use Cloud Sync, Mobile & Web, Bill Pay0 -
Hello All,
Thank you for chiming in on this discussion.
Just checking to see if the recommended steps resolved the issue for you or if you still need assistance.
Yes, Web Connect accounts do have a Deactivate button, as shown in your screenshot.
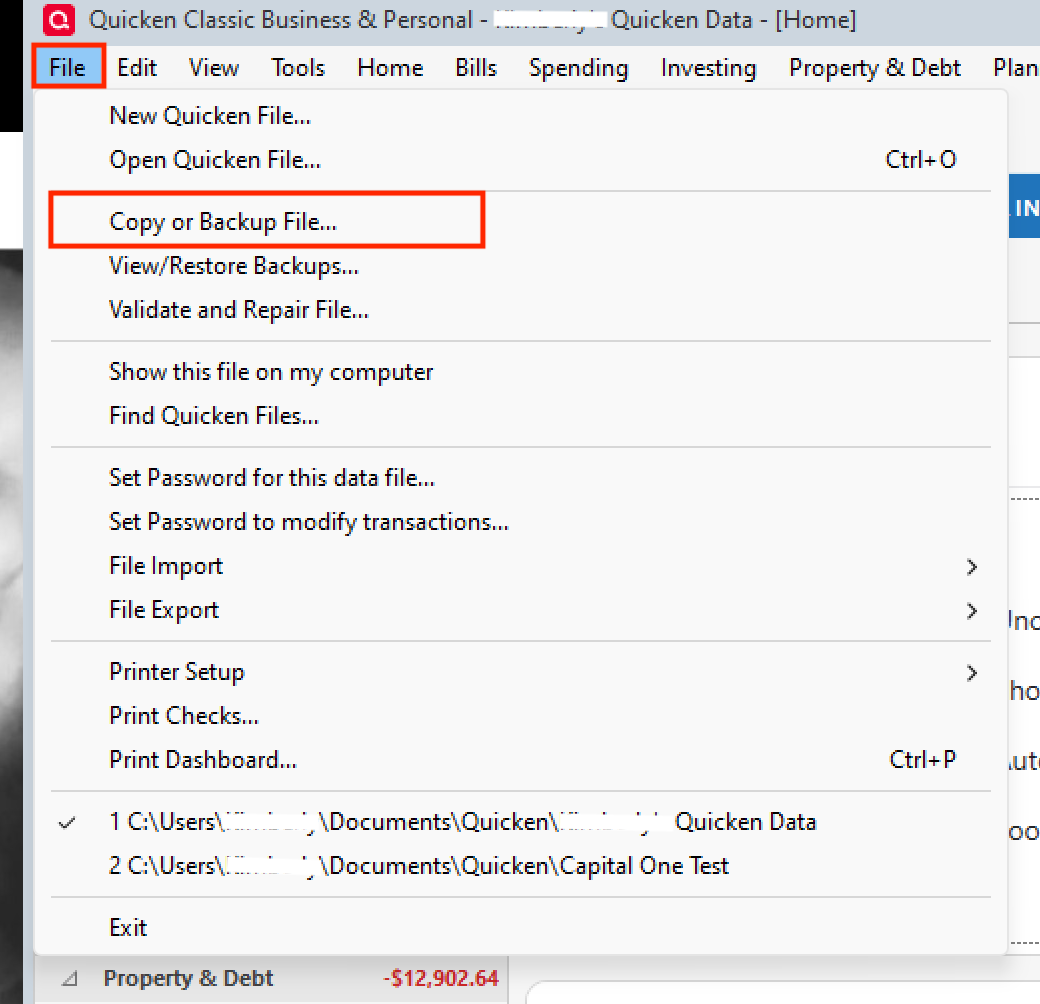
If the Validation steps did not resolve the issue, you can try copying your data file.
To do this:
- Go to File > Copy or Backup File.
- In the Backup or Copy File window, under Advanced Options, select Create a copy or template.
- Click Next.
- Choose what you want to include in the copy.
- This is where you can set the Include transactions From and To dates to control which transactions are included.
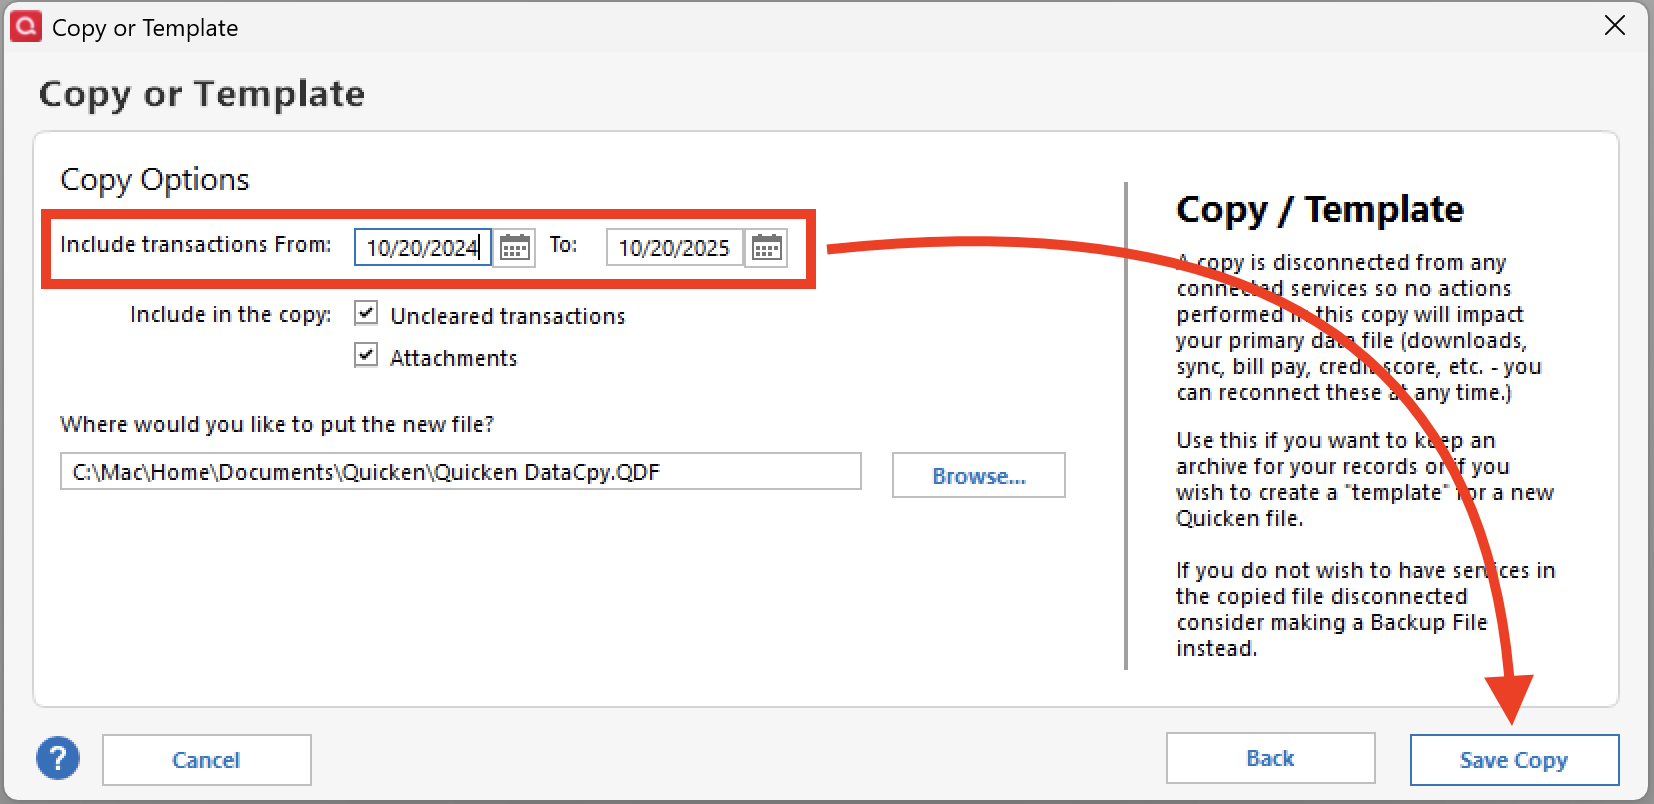
- This is where you can set the Include transactions From and To dates to control which transactions are included.
- Name and Save the copied file.
- When asked which file you would like to open, choose New Copy.
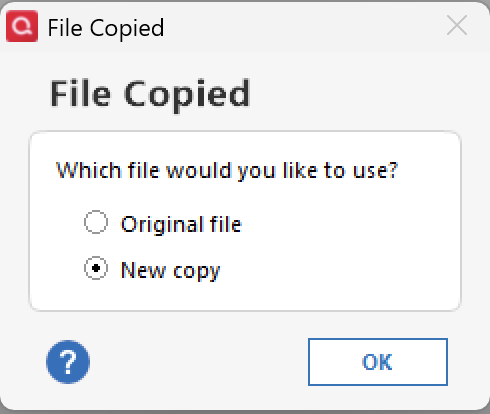
Note: Once you are in the new file, you will need to reconnect all of your accounts. If at any point you want to get back to your original file, you can do so by going to File and selecting the second file listed at the bottom of the menu.
Let us know how it goes!
Quicken Alyssa
Make sure to sign up for the email digest to see a round up of your top posts.
0 - Go to File > Copy or Backup File.
-
Just checking in, we haven't heard back from you in a while.
Do you still need assistance?
Thank you!
Quicken Alyssa
Make sure to sign up for the email digest to see a round up of your top posts.
0 -
Unless I'm mistaken, you should be able to activate your BofA account(s) for downloading with One Step Update by doing a Tools / Add Account process and selecting the new BofA financial institution name from the list:
Bank of America - QuickenI tried the above process - there was no option for "Bank of America - Quicken." And it ended up creating a second BofA account in my Quicken (which I deleted, because that's not what I need) and it did not activate my current BofA acct to download transactions from BofA.
And I am now nervous about the above process as it downloaded the past year's transactions into the newly created BofA account. I definitely do not want to risk that happening in my current BofA account - it would create duplicates of every transaction for the past year.
I just want to connect with BofA so I can download transactions now & in the future.
0 -
Thank you for following up.
You are correct, "Bank of America - Quicken" was an option you could connect to in the past. Bank of America recently had a migration, and now you should be using "Bank of America" to connect. You can read more about this in this Community Alert.
For your situation with duplicate accounts, you should delete the newly created accounts and then go through the process again. Did the validation we did earlier bring back the deactivate button? If so, follow these steps:
- Delete the duplicate accounts.
- Create a backup of your Quicken file first.
- Deactivate all Bank of America accounts in Quicken.
- Select the Tools menu and select Account List....
- In the Account List, select the account you want to deactivate, and then click Edit.
- In the Account Details window, click the Online Services tab.
- Click Deactivate next to the service you want to disable.
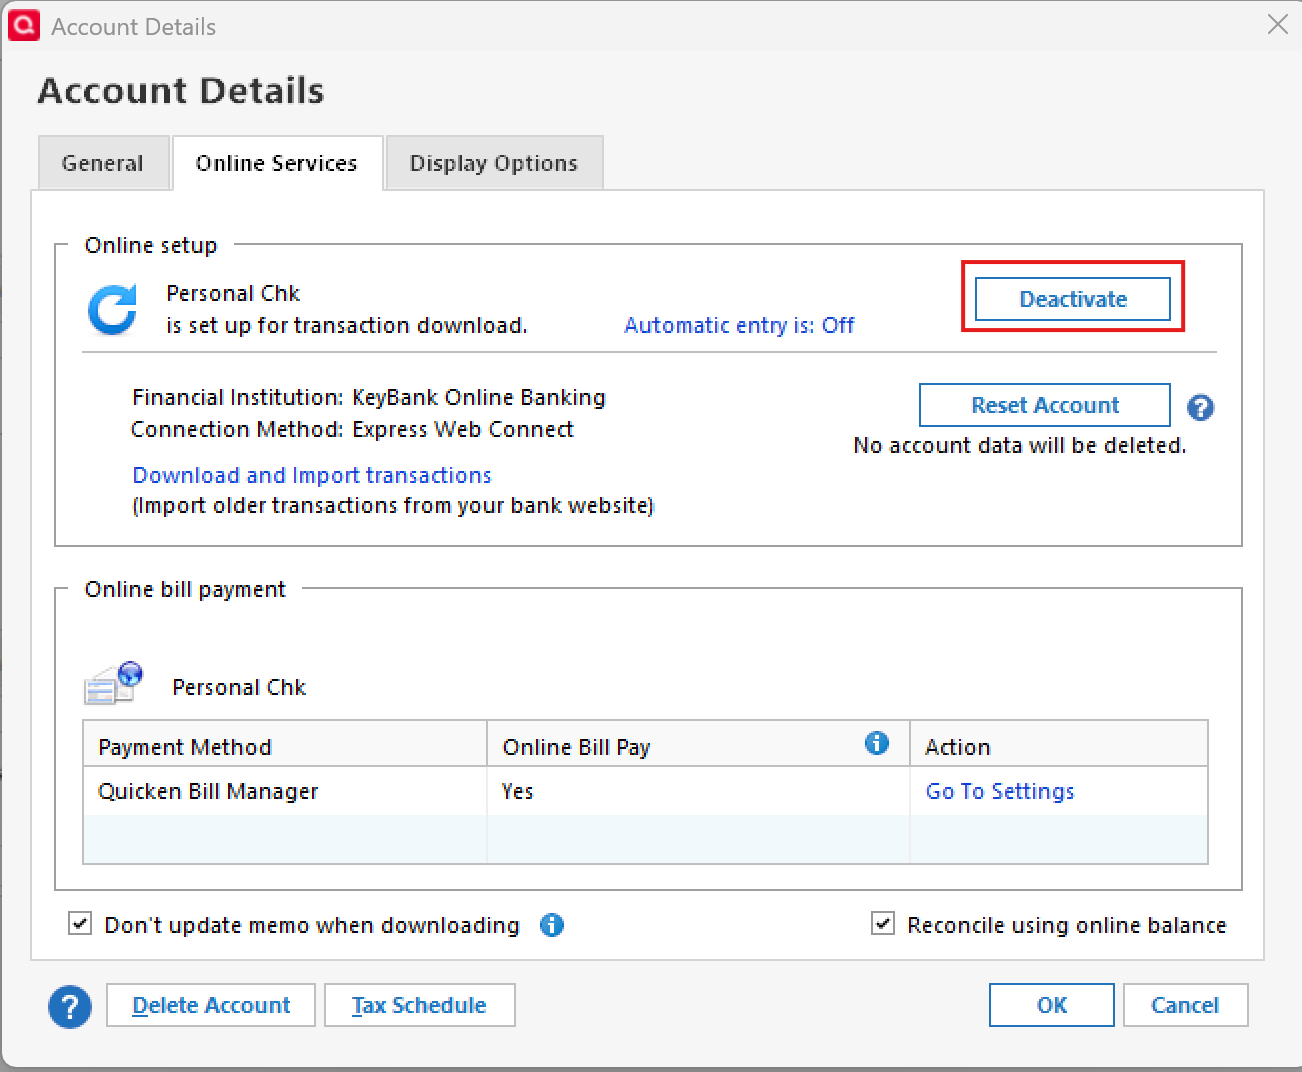
- Click Yes to the message confirming if you want to disable this service. Note: If you do not receive this message, additional information is available below.
- Click OK to the confirmation message.
- If you have an investment account that is linked to a cash account, you need to deactivate the online services from the investment account, which will automatically deactivate the linked cash account.
- Important: If you are deactivating/reactivating an account to fix an issue, you'll need to deactivate all the accounts with the affected financial institution that you have activated in Quicken (including hidden ones). Once they're all deactivated, then you can follow the steps to reactivate.
- Revoke Quicken’s third-party access from the Bank of America website.
- Reactivate the accounts in Quicken.
- Go to Tools > Add Account.
- Select "Bank of America".
- You will be redirected to the bank's website, where you can enter your credentials.
- You should be prompted to authorize access for Quicken.
- When you are redirected back to Quicken and the list of located accounts appears, choose LINK next to each account you want to reactivate.
- Click Next, then Done on the last prompt.
- Go to Tools > Add Account.
If you still do not have a deactivate button, you should delete the duplicate accounts, and then follow the steps outlined in my post above for copying your file before reconnecting accounts.
Let us know how it goes!
Quicken Alyssa
Make sure to sign up for the email digest to see a round up of your top posts.
0 -
Checking in again.
Were you able to complete the steps?
- If so, did they resolve this issue for you?
- If not, do you still need help?
Looking forward to your response!
Quicken Alyssa
Make sure to sign up for the email digest to see a round up of your top posts.
0 -
Hello again,
Checking in once more before this thread is closed.
Let us know if you still need assistance.
Thank you!
Quicken Alyssa
Make sure to sign up for the email digest to see a round up of your top posts.
0